
Dental pulp is the only soft tissue within the dental structure, located in the pulp chamber surrounded by dentin. The odontoblasts that line the periphery of the pulp are capable of forming dentin. However, due to the lack of effective collateral blood circulation within the pulp, damage to the pulp is usually difficult to heal and can easily cause pain. Additionally, dental diseases such as cavities, tooth cracks, wedge-shaped defects, and periapical periodontitis can affect the pulp, leading to congestion and inflammation. As a result, pulpitis is a common type of dental disease.
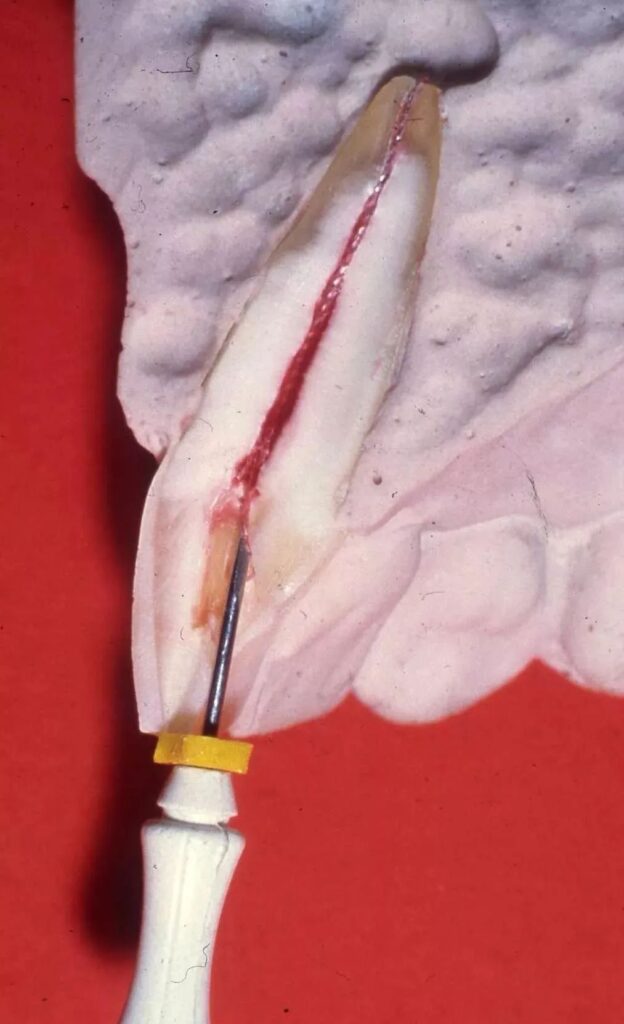
Patients with pulpitis typically undergo root canal therapy to alleviate the dental issue. The cavity inside the tooth is referred to as the “root canal system.” Compared to simply “killing the nerve,” “root canal treatment” not only involves “killing” the pulp in the “root canal” but also its complete removal, thorough cleaning, and rigorous disinfection, followed by the sealing of the “root canal” with artificial filling material.
In clinical practice, many doctors may encounter particularly complex root canal systems where, despite emphasizing caution repeatedly, they cannot completely remove all necrotic pulp tissue. This can lead to the failure of a root canal filling. How can one completely remove the pulp? This has become a topic of ongoing reflection and exploration for many clinicians.

**I. Key Points for Complete Pulp Removal**
1. **Use of Broaches for Pulp Removal:**
Broaches come in sizes “0,” “00,” and “000.” For larger root canals, a “0” broach is used, while for smaller canals, a “000” broach is chosen. Based on clinical experience, it’s recommended to choose a finer broach than the one seemingly required. For instance, if the canal diameter suggests a “00” broach, a “000” broach should actually be used. This helps prevent the broach from breaking inside the canal, especially in curved canals.
2. **Anesthetize Vital Teeth or Use Pulp Devitalization:**
To avoid incomplete pulp removal, preoperative X-rays should be taken to understand the canal structure, and new broaches should be used. The basic steps for pulp removal are as follows: Insert the broach into about two-thirds of the canal depth, gently twist to wrap the pulp around the broach, and then extract. The color and structure of the pulp vary with the disease state. Normal pulp is extracted in a stringy, resilient, pink form; diseased pulp may appear pale or congested reddish-brown, and if infected by putrefactive bacteria, accompanied by a foul smell.
3. **Techniques for Removing Pulp with Chronic Inflammation:**
This pulp is brittle and difficult to extract in one piece. Any remaining pulp can be removed using a broach or a #10 K-file inserted into the canal, gently vibrating it, and then repeatedly irrigating with 3% hydrogen peroxide and saline to flush out debris.

4. **Dual Broach Technique:**
Typically used for anterior teeth with traumatic or accidental pulp exposure, the broach can be inserted to two-thirds of the root length, approaching the apical foramen, and rotated 180 degrees to extract the pulp. For large anterior canals, the dual broach technique can be considered.
The dual broach technique involves: disinfecting with 75% alcohol at the canal entrance, using a smooth broach to create a path along the distal canal wall to the apical third, then using two barbed broaches, one in the distal and one in the mesial path, crossing the handles and rotating 180° to hook the pulp. Avoid forceful actions to prevent breaking the broach in the canal.
5. **Techniques for Posterior Teeth Pulp Removal:**
For posterior teeth, relying solely on broaches may not fully remove the pulp, especially in the late stages of pulpitis where the pulp is deteriorated. A small file (#15 to #20, not exceeding #25) should be used with gentle force, repeatedly lifting (never pushing) to reach the apex, followed by using a “00” or “000” broach to remove any pulp remnants.
6. **Handling Residual Pulp:**
If there is residual pulp, seal a cotton pellet soaked in a saturated ethanol solution of hydroquinone in the canal for 5-7 days (in-canal devitalization) before proceeding with further treatment.
7. **Role of EDTA:**
EDTA, widely recommended in recent years, can be used before pulp removal by adding a small amount into the canal, providing lubrication to facilitate complete pulp extraction. It has multiple other functions:
(1) Chelation with Ca, decalcifying and softening the hard tissues of the canal wall, aiding in the dissolution of dentin, saving time in mechanical preparation, and aiding in expanding narrow or blocked canals.
(2) Significant antimicrobial properties.
(3) Mildly irritating to soft tissue, non-toxic, and usable as a root canal irrigant.
(4) Non-corrosive to instruments.
(5) Opens dentinal tubules to increase medication penetration.
If root canal sensitivity due to residual pulp occurs during follow-up visits, inject prilocaine into the pulp chamber then completely remove the remaining pulp.
8. **Cleaning the Broach:**
After using the broach, it can be challenging to clean. A quick and simple method involves holding a toothbrush in the right hand and the broach in the left, brushing from the tip to the handle while rinsing with water. If difficult, rotate the broach clockwise twice, which won’t damage it.

Leave a Reply