
As one of the most common complications in root canal treatment, broken instruments can be quite challenging for many dental practitioners. They not only hinder the treatment process but also affect the prognosis for the patient. The success of removing a broken instrument depends on various factors, including the location, visibility, size, length, and type of the broken instrument, the curvature and radius of the root canal, and the operator’s experience.
Currently, there are several methods to remove broken instruments clinically. An article published in Case Reports in Dentistry introduced four cases where broken instruments were successfully removed using different methods, which can serve as a reference for practitioners.

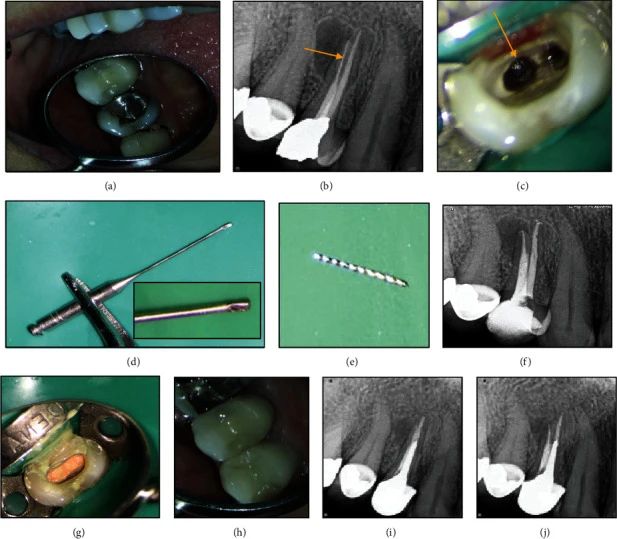
Case 1: Removal of Broken Instrument with Ultrasonic Instrument
A 30-year-old female patient complained of pain when biting on her right upper first premolar. Percussion (+), no mobility, normal probing depth. An periapical X-ray showed a broken instrument in the palatal root, with radiolucent areas around the periapical region of the palatal root. The treatment process was as follows: Removal of old fillings, re-treatment of the pulp, use of rotary nickel-titanium instruments and chloroform to remove gutta-percha; Modified Gates-Glidden drills were used under a microscope at ×15 magnification to remove the dentin wall around the coronal 2 mm of the broken instrument, and a 25-gauge U-shaped file was moved around the broken instrument in a counterclockwise direction. Approximately 10 minutes later, the broken instrument was successfully removed. Subsequently, root canal preparation, irrigation and disinfection, lateral compaction filling, and crown restoration were performed, with the patient reporting no discomfort during follow-up.
Case 2: Removal of Broken Instrument with BTEX-PEN
A 29-year-old female patient complained of pain when chewing on her right upper second premolar. A periapical X-ray showed no abnormal periodontal conditions, a broken instrument in the palatal root, and a perforation in the buccal root, with a material similar to MTA filling the buccal root canal. The treatment process was as follows: Ultrasonic and flushing removal of old root fillings, under a microscope at ×15 magnification, the dentin wall around the coronal 2 mm of the broken instrument was removed, and a 25-gauge U-shaped file was moved around the broken instrument in a counterclockwise direction, but the broken instrument was not removed. Attempts were made using the BTEX PEN, successfully removing the broken instrument. The perforation in the buccal root was sealed with MTA, followed by root canal preparation, irrigation and disinfection, root canal filling, with the patient reporting no discomfort during follow-up.
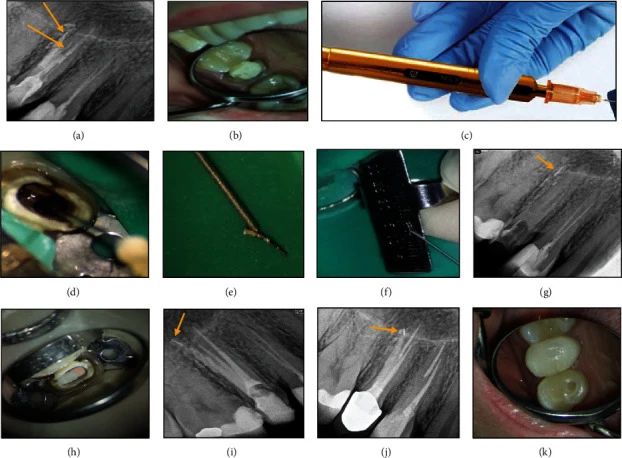
Case 3: Removal of Broken Instrument with Spinal Needle
A 44-year-old female patient complained of pain when chewing on her left upper first premolar. Oral examination showed a composite resin filling on the left upper first premolar, with normal periodontal conditions. An X-ray showed a broken instrument in the apical 1/3 of the palatal root, with no abnormalities at the apex. The treatment process was as follows: Removal of old fillings, exposure of the broken instrument, under a microscope, the dentin wall around the coronal 2 mm of the broken instrument was removed, and under a ×20 magnification microscope, a 21-gauge spinal needle was used to create a window and polish at 1 mm from the tip, the cannula was wrapped around the coronal part of the broken needle and fixed, and then successfully removed. After removal, root canal preparation, irrigation and disinfection, lateral compaction filling were performed.

Case 4: Removal of Broken Instrument with Stieglitz Forceps
A 27-year-old female patient complained of pain in her left upper second molar. Clinical examination showed pain on percussion, with normal periodontal conditions. An X-ray showed no abnormalities at the apex, with a broken instrument visible in the middle 1/3 of the buccal root canal. The treatment process was as follows: Removal of temporary restorations, under a ×10 magnification microscope, ultrasonic removal of the dentin wall around the coronal 2 mm of the broken instrument, followed by successful removal using Stieglitz forceps to grip the coronal part of the broken needle. Subsequently, root canal preparation, irrigation and disinfection, lateral compaction filling, and crown restoration were performed.
What are the advantages and disadvantages of these four methods? How should one choose?
To successfully remove a broken needle, one must first establish a straight-line path, removing the dentin wall around the coronal 1~2 mm of the instrument to fully expose the coronal part of the instrument. For this step, ultrasonic instruments can safely and controllably remove dentin, making them more recommended. However, studies have found that compared to other methods, using only ultrasonic instruments to remove broken needles (as shown in Case 1) takes longer, and excessive use of ultrasonic instruments in the apical 1/3 increases the risk of perforation.
The BTEX-PEN is a broken needle removal tool based on circular technology. It includes a pen-like handle, with three sizes of needles (25#, 27#, and 30#) and wires (diameters of 0.05, 0.08, and 0.1 mm) connected to the top of the handle, each with different tensile strengths. The appropriate diameter should be selected based on the size of the root canal and the broken needle, and the coil radius can be adjusted by turning the embedded screw on the handle. Compared to using ultrasonic instruments alone, this method takes less time.
Before removing a broken needle with a spinal needle, a window needs to be opened slightly above the needle tip with a high-speed handpiece. When placed around the broken needle, the inner core enters the spinal needle from the other side, pushing the broken needle into the window, and then the coronal part of the broken needle is fixed in the tube, and it is rotated out. This method requires the use of a microscope, and the operator’s experience and skills are also key to the success of this technique. Due to the larger diameter of the cannula, more dentin usually needs to be removed, which also relatively increases the risk of apical perforation.
The Stieglitz forceps, due to their size limitations, are only suitable for broken needles in the coronal 1/3 of the root canal.
All four of the above methods require the assistance of a dental microscope. Which method do dental practitioners use most often to remove broken needles? Feel free to leave a comment to add more methods~

Leave a Reply